Full list of the upcoming fairs in our area that I know of, please feel free to share more if I have missed them out x
26th November, Lancaster
3rd December, Cleveleys
4th December Preston
4th December Fleetwood
10th December Blackpool
10th December Poulton
15th December Blackpool

Showing posts with label craft. Show all posts
Showing posts with label craft. Show all posts

Biggest ever vintage and handmade craft fair!!!
I have taken the plunge and gone and book one of Blackpool's greatest landmarks The winter gardens for a summer vintage and handmade craft fair!!
its going to be a two day spectacular of crafts, vintage, entertainment and music with craft workshops, a vintage tearoom and lots of handmade goodness.
There will be over a 100 stalls selling the northwest's finest gifts, clothes, toys, accessories, food, art, cards, homewares and much ...more. We are lucky enough to have two performances on the sunday from the very lovely burlesque performer Kitty Koko and I am so hounered to annouce that the amazing Kirsty Almeida will be performing too - how amazing is that.
We shall be having various bands performing over the weekend on the stage and tea and cakes served on vintage china all in the beautiful art deco surroundings of the Pavilion theatre at the Winter Gardens situated in the middle of Blackpool town centre 23rd June 10am - 5pm and 24th June 2012 10pm - 4pm Free entry.
Stalls are still available but going fast öa325 for one day or öa345 for the full weekend. We can set up from 8am and as it is a secure locked area you can leave your stalls set up overnight if you are doing a full weekend. You will get a table and 2 chairs with extra space around you if you want to bring rails, furniture etc, please let me know in advance of any requirements you have regarding this so I can accommodate you.
There are people coming from all over, Newcastle, Manchester, Liverpool, Cumbria, Yorkshire to name a few so if you want to have a stall but don't drive just get in touch Im trying to organise a lift share.
 Any questions please feel free to ask, I know this is going to be an awesome event and can't wait to see you there. If you can will you share this link with your friends and followers, if you share it leave me a comment in the comment box on here or send me a message on facebook (Dotty D Lightful) with a link to where you have shared it and you will be entered into a prize draw to win some lovely handmade goodies x
How to Make a Photo Album OUt of a CD Jewel Case
Learn how to make a cool photo album or brag book using a CD case. This makes a special gift by personalizing it for grandma, a special aunt, or best friend. You can give it to them blank and let them fill the pages or you can fill the pages with pictures, sayings, etc.
* Age Guideline: 8 Years +
* Time Required: 45-60 minutes (Does not include drying time)
The above age and time guidelines are estimates. This project can be modified to suit other ages and may take more or less time depending on your circumstances.
Materials Needed:
* CD Jewel Case
* Cardstock
* Ribbon
* Miscellaneous Craft SUpplies
* Craft Glue
* Stapler
* Scissors
Instructions:
Cut several pieces of cardstock about a half an inch smaller than the CD case. Cut as many as will fit inside the CD case. Stack your cardstock pieces on top of each other, lining up the edges, and put a couple of stages along one edge to make a booklet.

Now you can simply place this little booklet inside the CD case, or you can glue the stapled edge to the spine of the CD case. If you do glue it in, be generous with the craft glue and let it dry completely before you try to flip the pages. When you flip the pages of the book once the glue is dry, make sure you do so by folding the page close to the binding rather than pulling at the page and the binding.
Now your CD brag book is now ready to be decorated. Add a ribbon so you can tie the CD book closed. This is optional, but recommended. I added two ribbons. Embellish to your heart's content!
Halloween Card to Craft
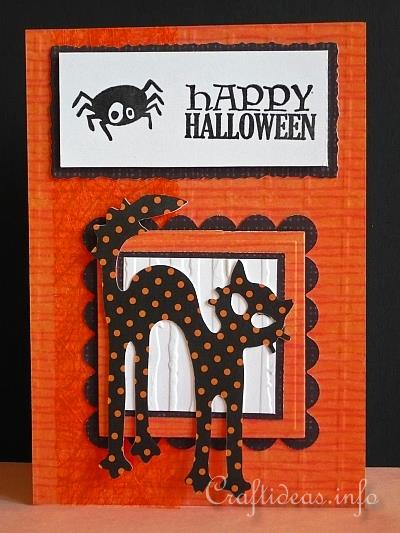
Halloween Card to Craft - Happy Halloween Card With Spotted Black Cat This spooky black cat looks unique with its orange spots. You can of course substitute any Halloween paper you like if you would prefer a different look. In just a few minutes this card using scrapbook paper, die cuts and clear stamps will be completed and ready to give. Supplies Needed: - white card - orange patterned scrapbook paper and black scrapbook paper covered with orange spots - white cardstock - Sizzix Big Shot - Sizzix dies “Squares, scallop #2” and “Cat and Moon” - Sizzix embossing folders of choice (to emboss the orange card background and the white square background behind the cat) - Fiskars clear stamp set “Halloween Night” (see picture below) - black pigment stamping ink - clear embossing powder - orange fiber ribbon - quilter’s ruler or standard ruler - craft cutting knife - decorative edged scissors - 3-D foam tape - stick glue This is the stamping set from Fiskars that was used for the card. Instructions: 1. Cut and emboss a sheet of orange patterned scrapbookpaper to cover the front of the card. 2. Cut a piece of fiber ribbon to fit the card lengthwise and glue it using stick glue to the left side of the card. 3. Die cut the larger black patterned paper scallop out using the Sizzix die and set it aside for the moment. 4. Cut 2 orange patterned paper squares measuring 6 and 6.5 cm and glue the smaller square centered onto the larger square. 5. Cut a black square measuring 5.2 cm and glue it centered onto the smaller orange square. 6. Cut and emboss a white square measuring 4.8 cm and glue it onto the black square. 7. Now take the square “sandwich” and adhere it onto the black scallop using 3-D foam tape. 8. Die cut a cat from the spotted paper and adhere it onto the squares. 9. Stamp and emboss the Halloween message and a spider onto a 3.5 x 8.3 cm rectangle. Adhere the rectangle onto a piece of black patterned scrapbook paper and cut it out with a 4 mm border using the decorative edged scissors. Now adhere the rectangle to the top of the card. 10. Glue the scallop onto the card below the rectangle.
Plushie - Standing Dog

Matterial
1/2 yard of polar fleece or woolen felt
2 buttons for eyes
1/2 inch ribbon for bow
Toy filling
2 skeins of embroider thread
This sewing pattern shows you how to make a standing dog plushie which makes a great snuggle baby toy.
Using the pattern below print off the pattern sheets to fit onto an A4 sized paper.


Cut out all your pattern pieces following the pattern sheets.
This pattern is sewn together using embroidery thread in a blanket stitch finish. You could also sew this pattern together using a sewing machine.
Sew inner leg to the body piece on both legs.
Sew down the back seam,
Sew in the tummy gusset
Sew soles to the bottom of the feet.
Assemble the head -
Stitch the head gusset to both sides of the head, the gusset goes from the nose to the back of the neck.
Sew the button eyes into place
Stitch the ears into place
Stitch the head to the body leaving a gap for filling.
Using toy filling stuff the dog to suit your plumpness. Finish off by sewing the bottom closed.
Light Bulb Reindeer Craft

Use these free directions and pattern to create a reindeer Christmas tree ornament using an old light bulb.
* Age Guideline: 6 Years and Up
* Time Required: 30 minutes (Does not include drying time)
The above age and time guidelines are estimates. This project can be modified to suit other ages and may take more or less time depending on your circumstances.
Materials Needed:
* Light Bulb
* Newspaper
* Paper Mache Paste
* Paint
* Craft Foam or Felt
* Ribbon
* 3/4-Inch Red Pom-Pom
* Craft Glue or Hot Glue Gun and Glue Sticks
* Paint Brush
* Scissors
Instructions:
I put 3 layers of paper mache on my light bulb first. Read this article about how to paper mache.
Paint the light bulb with brown paint. Let the paint dry completely. I set the neck of the light bulb into an empty film container. This worked great while the paint dried!
With the neck of the light bulb pointing up, paint eyes and a mouth on the reindeer. Glue on the red, pom-pom nose.
Cut two antlers out of fun foam or felt using the pattern below. Glue one to each side of the light bulb neck.
How to Make Your Own Bath Salts ?

Sheryl explains how to make colored bath salts. A fun gift idea.
Materials:
- Bottle or Jar
- Epsom Salts
- Food Coloring
- Perfume or Essential Oil
Instructions:
Combine the desired amount of Epsom salts (enough to fit in your bottle or jar) with food coloring. Mix well so color is even. Add your perfume or essential oil and mix again. Spread the mixture out on a sheet of wax paper to dry for a couple of hours and then put it in the bottle or jar.
While the salts can be used right away, the perfume or essential oil will blend better with the salt if it is allowed to set in the jar for a few weeks.
Subscribe to:
Posts (Atom)