Showing posts with label baby shower. Show all posts

Made Diffuser Bottle Craft


How to Decorate and Personalize an Empty Diffuser BottleRe-Made Diffuser Bottle CraftSubmitted by Stella Stella explains how she transformed an empty diffuser bottle into a colorful and useful work of art. Stella thinks this is a very easy project and a great way to recycle bottles, and I couldn't agree more! Age Guideline: 8 Years and Up Time Required: 60 minutes (Does not include drying time) The above age and time guidelines are estimates. This project can be modified to suit other ages and may take more or less time depending on your circumstances. Materials Needed:
One empty diffuser bottle Sea Shells Glass Beads Blue Stained Glass Cobbles E6000 Glue Craft Stick - (for applying glue) Instructions:
Clean the bottle of all labels and glue. Lay the bottle down flat on your work surface. Stella used a towel to hold hers in place. Glue on the glass cobbles. Glue on the sea shells. Glue the on beads. Let the glue dry completely before moving or using the diffuser bottle.

Halloween Card to Craft


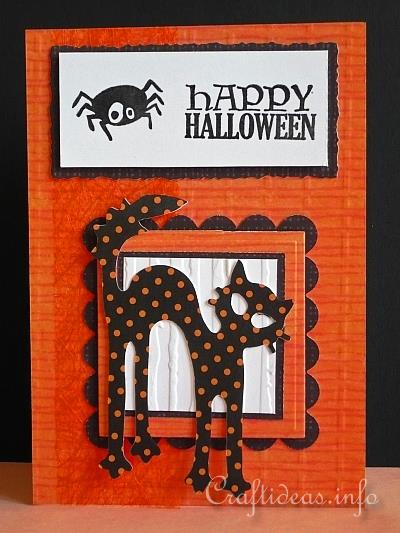
Halloween Card to Craft - Happy Halloween Card With Spotted Black Cat This spooky black cat looks unique with its orange spots. You can of course substitute any Halloween paper you like if you would prefer a different look. In just a few minutes this card using scrapbook paper, die cuts and clear stamps will be completed and ready to give. Supplies Needed: - white card - orange patterned scrapbook paper and black scrapbook paper covered with orange spots - white cardstock - Sizzix Big Shot - Sizzix dies “Squares, scallop #2” and “Cat and Moon” - Sizzix embossing folders of choice (to emboss the orange card background and the white square background behind the cat) - Fiskars clear stamp set “Halloween Night” (see picture below) - black pigment stamping ink - clear embossing powder - orange fiber ribbon - quilter’s ruler or standard ruler - craft cutting knife - decorative edged scissors - 3-D foam tape - stick glue This is the stamping set from Fiskars that was used for the card. Instructions: 1. Cut and emboss a sheet of orange patterned scrapbookpaper to cover the front of the card. 2. Cut a piece of fiber ribbon to fit the card lengthwise and glue it using stick glue to the left side of the card. 3. Die cut the larger black patterned paper scallop out using the Sizzix die and set it aside for the moment. 4. Cut 2 orange patterned paper squares measuring 6 and 6.5 cm and glue the smaller square centered onto the larger square. 5. Cut a black square measuring 5.2 cm and glue it centered onto the smaller orange square. 6. Cut and emboss a white square measuring 4.8 cm and glue it onto the black square. 7. Now take the square “sandwich” and adhere it onto the black scallop using 3-D foam tape. 8. Die cut a cat from the spotted paper and adhere it onto the squares. 9. Stamp and emboss the Halloween message and a spider onto a 3.5 x 8.3 cm rectangle. Adhere the rectangle onto a piece of black patterned scrapbook paper and cut it out with a 4 mm border using the decorative edged scissors. Now adhere the rectangle to the top of the card. 10. Glue the scallop onto the card below the rectangle.

Plushie - Standing Dog


Matterial

1/2 yard of polar fleece or woolen felt
2 buttons for eyes
1/2 inch ribbon for bow
Toy filling
2 skeins of embroider thread


This sewing pattern shows you how to make a standing dog plushie which makes a great snuggle baby toy.

Using the pattern below print off the pattern sheets to fit onto an A4 sized paper.

Dog Plushie Pattern 1

Dog Plushie Pattern 2

Cut out all your pattern pieces following the pattern sheets.

This pattern is sewn together using embroidery thread in a blanket stitch finish. You could also sew this pattern together using a sewing machine.

Sew inner leg to the body piece on both legs.

Sew down the back seam,

Sew in the tummy gusset

Sew soles to the bottom of the feet.

Assemble the head -

Stitch the head gusset to both sides of the head, the gusset goes from the nose to the back of the neck.

Sew the button eyes into place

Stitch the ears into place

Stitch the head to the body leaving a gap for filling.

Using toy filling stuff the dog to suit your plumpness. Finish off by sewing the bottom closed.

Baby Girl Shower Theme Ideas

Planning a shower for a baby girl? A great way to save some money and still make the baby shower super personal is to make your own baby girl shower invitations! The party starts with the invitations so this is a good way to come up with some unique themes and ideas for throwing a really cute DIY baby shower. While your out picking up supplies to make your invitations make sure and buy plenty of extras to make matching favors and decorations, not to mention, some cute matching Thank You notes to give to the guest of honor.


Where to Start...

The best place to start when making your own baby shower invitations is to choose some paper. A really economic way to create invitations is by using cardstock. By cutting, scoring, and folding cardstock you can create the base of a handmade card. You can even purchase cardstock in different thichkness, colors, and even textures at places like office supply stores and arts and crafts hobby stores. You'll find cardstock in every color under the sun at an arts and crafts supply, as well as textures like embossed and even glitter cardstock.


For a quick and easy option you can purchase blank cards to use as the base for your homemade baby shower invitations. These are cards that are already scored and folded and many times come with the correct size matching envelope. They are completely blank inside and out. Just decorate them, print or stamp the invitation wording to the inside and you are done!
I also like to create matching envelope liners and glue, stamp, or print an image to the outside of the envelope.


Creating Hanmdade Baby Girl Invitations

Any of the ideas and tutorials on this site can be used to create baby girl shower invitations. Simply switch up the papers to a baby girl theme and viola! Use the ideas and tutorials as inspiration but you do not have to stick by the book. Get creative and make your invitations your own!
Search for baby girl or theme inspired rubber stamps, paper punches, ribbons, and papers. Mix and match colors, shapes, and textures!


Baby Girl Shower Invitations Inspiration...


Cardstock

Rubber Stamps

Die Cuts

Cute Brads


Baby Girl Shower Theme Ideas

  • Sweet pea/pea pods
  • Princess
  • Butterfly
  • Jungle
  • Monkey
  • Teddy Bears
  • Piglets
  • Classic footprint shower
  • Pink Roses
  • Candy (sugar and spice)
  • Chocolate (pink and brown candy bar inivtes)
  • Handprint
  • Ballerina