
How to Make a Suet Bird Feeder
by Jane Lake
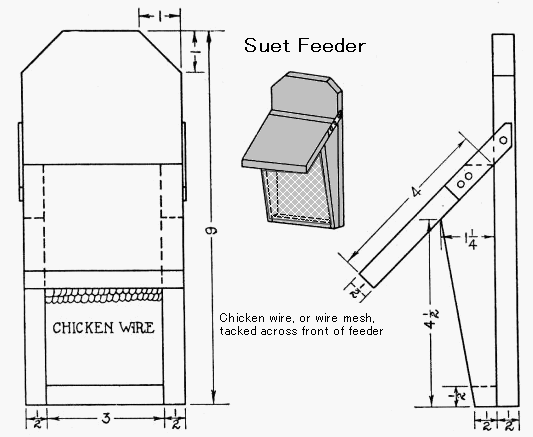
Here is a free woodworking plan to make a simple, homemade suet feeder for the birds. The schematic plan was originally published in 1916, in the book, Bird Houses Boys Can Build, by Albert F. Siepert. But girls, ladies, or gentlemen beyond boyhood shouldn't be deterred; almost everyone will find this little birding project easy enough to do, as it requires only basic woodworking skills.
Suet Feeder Supplies
- scraps of 1/2" wood, cut according to the diagram
- wood glue
- small hinges for lid
- nails
- chicken wire or 1/4 inch wire mesh
- wire cutters
- hand saw
- hammer
- pliers
- double-pointed U nails
- suet or suet cake
Suet Feeder Instructions:
1. Cut 1/2 inch thick wood according to the Suet Feeder Woodworking Plan.
2. Assemble wood pieces as indicated on the diagram, applying wood glue between each of the joins. Nail through the back of the main board to attach the angled side pieces to the front. Nail a small 3" x 1/2" wide shelf between the two sides to make the bottom of the feeder.
3. Attach the lid with metal hinges so that the lid rests on, and overhangs, the two sides. It should open upwards, allowing you to replace the suet as necessary.
4. Cut a piece of wire mesh about 1/2 inch bigger all around than the front opening. Fold over a 1/2 inch on each side so that the sharp wire edges will all be fastened inwards. Attach the wire to the front of the feeder with U-shaped nails, holding the nails steady with a pair of pliers as you drive them into place with the hammer.
Cautions:
- Children, of course, should always be supervised when using woodworking tools.
- Wear safety goggles when working.
- Be careful around the wire, as the edges can be sharp.
More Free Suet Feeder Plans
All you need is a log of suitable size, and a drill, to make this Log Suet Feeder, shown at left. Or look at the instructions and photos from the DIY Network showing how to make this easy suet feeder, open on two sides, which is suitable for kids to make with a little supervision.
No comments:
Post a Comment